Clark & Mayfield Reed 17 Travel Backpack Review
This post may contain affiliate links. Read my disclaimer policy.
Looking for a well-designed, roomy, comfortable backpack for your next trip? This review is for you!
Contents
UPDATE!
Unfortunately, it looks like Clark & Mayfield is no longer selling bags and backpacks. Such a bummer because I’ve loved using the backpack I reviewed below on all of my trips since 2019. I even used it on our recent 6-month travels in Germany, Türkiye, and the UK.
If you’re looking for a cute, functional, and affordable backpack for travel that can fit a tablet or laptop and has pockets for much-needed organization, here are some alternatives: this one, this one, this one, this one, this one, and this one. If you’d prefer something convertible that you can wear as a backpack or a bag, take a look at this one and this one.
—-
Before a winter 2019 trip to Germany I was asked by Clark & Mayfield if I’d like to review their Reed 17 backpack. The Portland, Oregon company came highly recommended by a friend of mine, and the pack looked like it would improve my travels, so I said YES!
Spoiler alert: the Reed 17 is my new favorite backpack. I’ve now used this backpack for over 3 years on several domestic and international trips.
I’m excited to share this review with you and tell you what I liked (and didn’t like) about the pack, so you can decide if it will work for you.

I’m actually surprised to say that because I’ve been happily using the same North Face pack for years and years. That said, I have been keeping my eye out for a backpack that looks more professional but still has all of the features I love in my North Face. The Reed 17 pack from Clark & Mayfield fit the bill with a super affordable price to boot!
Here’s what I love about the Reed 17 backpack:
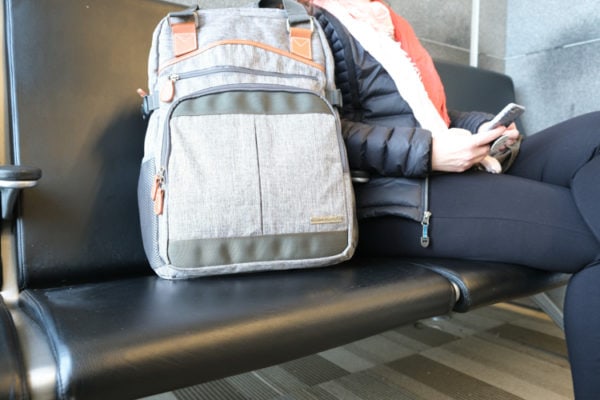
- The size. This pack is big enough that I was able to use just the pack and the carry-on suitcase for my 2-week winter trip to Germany. And anything that works for 2 weeks will work for much longer trip, so I like that I can easily use this pack for a much longer trip. I had plenty of room for everything I need while in transit to Germany, plus it worked vey well as a day pack. It fit under the airplane seat with no problems (and there was still room for my feet) and on my lap while on busses, trains, and trams in.
- Versatility. I used this pack as my personal item while flying to Germany, as a day pack while in Germany, and as my bag for groceries. Had I needed to lug my clothes to the laundromat, it would have worked well for that, too. No matter how much – or how little – I put in the pack, it was comfortable to wear.
- The pockets. I LOVED the pockets! That’s one thing I always look for in a pack because they help me stay organized. I really appreciate the interior mesh pockets.
- The color. I got the slate and I loved the color. They also offer the pack in deep teal and charcoal.
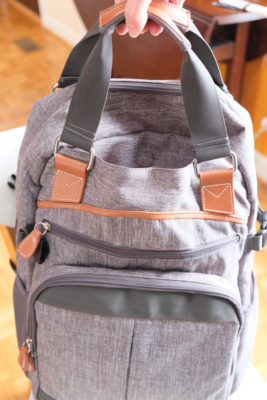
- Handles on the top of the bag. I wasn’t sure I’d like having two handles on the top but I ended up loving – and using – them.
- The price! Seriously, you can’t beat the price! While the original price was nearly $100, you can find it on Amazon now for under $30, which is amazing because it’s not a cheap looking backpack. My North Face pack was around $100 on sale several yeas ago.
Ok, now let me show you what I loved about the pack and how I packed it.
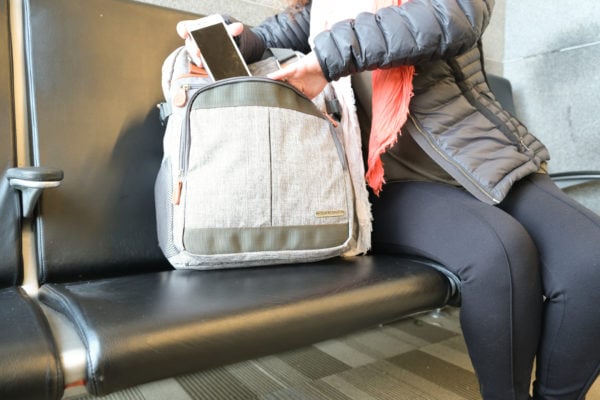
Starting with the front…the pockets! There’s a large yet slim front pocket that has a zippered internal pocket, a slip pocket, pen/card slots, and a key fob. I keep my keys, pens, make-up bag, lip balm, earbuds, and extra shopping bag here.
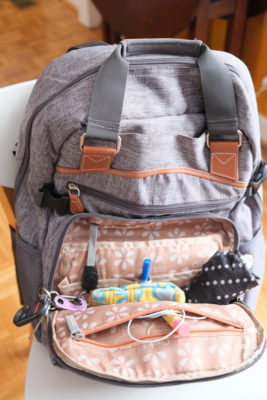
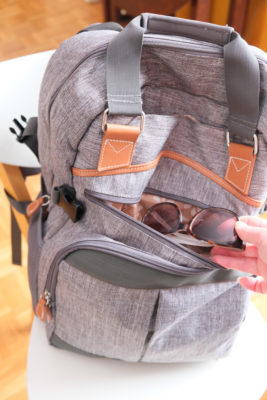
There’s also a zip pocket in the middle of the pack. This pocket was really easy to reach when I was wearing the pack so I often kept my phone and sunglasses in it.
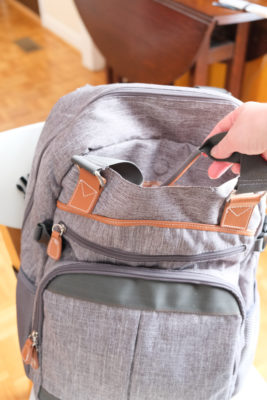
At the top of the pack there’s another pocket with a magnetic closure. This pocket is perfect for stowing the front handle but I also often stuffed my hat and mittens in it because it was so easy to get to. There’s another slip pocket on the back where you can stow the back handle. More about the handles in a bit…
On both sides of the pack are large mesh pockets. I didn’t use these much – I think I stowed my wet umbrella in them once or twice and an Apfelschorle drink bottle once – but then I rarely ever use any mesh pockets on the sides of any backpacks.
The pockets would work well for carrying a water bottle (even if just home from the store), umbrella, shopping bag, a rain jacket, an extra t-shirt, etc. Even though I don’t use these pockets regularly, they do come in handy.
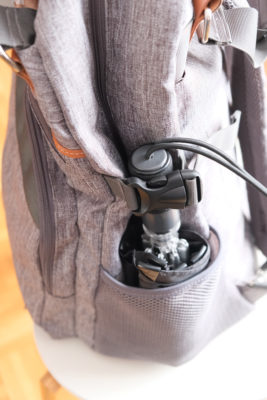
There’s also a cinch strap on each side of the pack, and I did use those a lot, mostly just for added security and compression. I do wish there had been two sets of cinch straps on each side so that the bottom of the bag could be compressed more when it’s on the empty side. It’s not absolutely needed and more of nice-to-have feature.
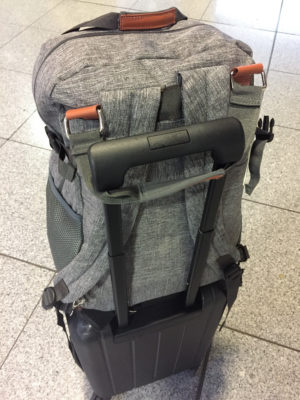
On the back of the pack is the back handle, the straps, and the luggage flap. There’s also a slip pocket for stowing the back handle or the backpack straps. While I used the pack primarily as a backpack, I did appreciate having the option to stow the straps and use the handles instead.
If using the pack for a work trip, for example, you can have the comfort of a backpack but also the look of a bag. It’s also a nice option for the plane. Stow the straps just before boarding to keep them out of the way and so they don’t drag on the plane floor when you put it under the seat in front of you. It’s super easy to unclip the straps and stow them in the pocket.
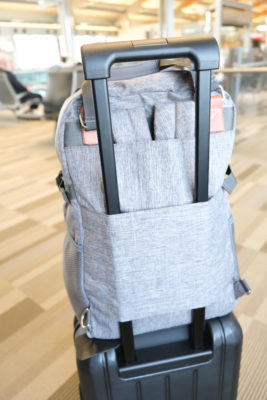
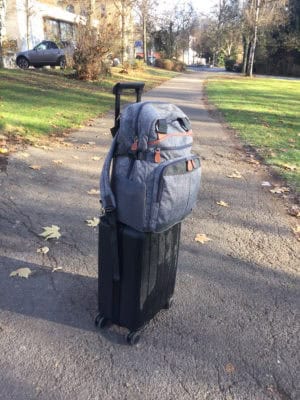
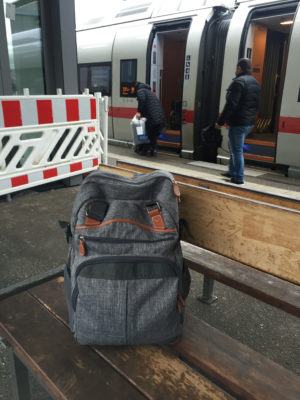
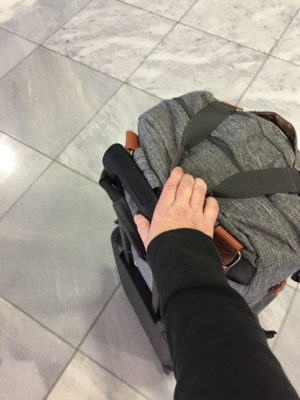
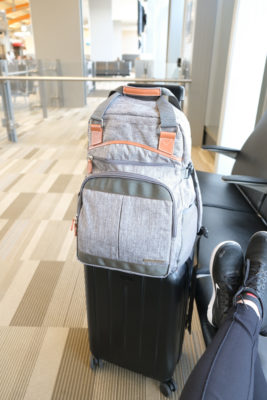
Another feature that I love is the luggage flap, which enables you to slip the backpack onto your suitcase! Even though it was comfortable to wear the pack while I was in transit, I so enjoyed having the option to place the pack on my suitcase, especially when waiting in line in hot and stuffy airports and boarding planes (no more hitting people with my pack as I walk down the aisle).
Here’s a tip: if you don’t need to take the pack off for a while, use the luggage flap. If you want your suitcase to carry your pack but will need to take it off the suitcase quickly, just use the back handle.
Whenever I boarded a plane, train or bus, I used the back strap to keep the pack secured to the suitcase so I could quickly remove the pack from the suitcase. When I walked through the airport or from the train station to my hotel, I used the flap so it stayed securely on the suitcase.
Let’s now look inside this awesome backpack.
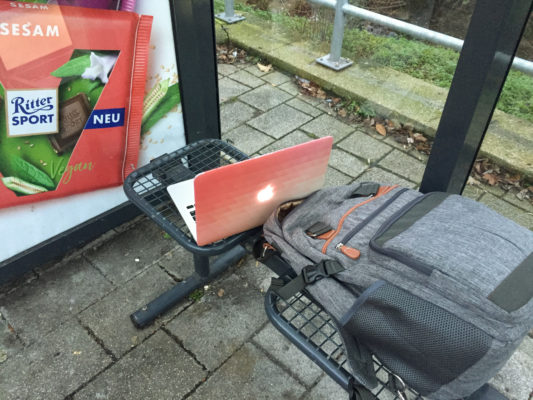
Two of my favorite features of the pack are in here! In the back of the back there’s a laptop sleeve and an iPad sleeve. I carried my laptop in that sleeve almost every day but I don’t use an iPad so I put my Moleskin journal in the smaller sleeve.
The back of the pack is nicely padded to support your back and your laptop. There’s also an elastic/Velcro strap to keep your laptop secure. I have a 13-inch Macbook Pro but the pack accommodates up to a 17-inch laptop.
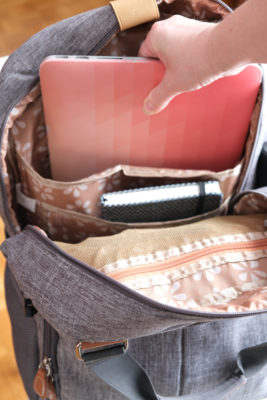

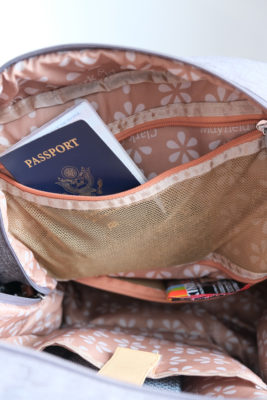
Ok, we’re now to the two features that I really loved…the two interior mesh zip pockets. I LOVE having these pockets because they keep me so much more organized. No more rooting around in my pack looking for my apple or granola bar!
In the bottom mesh pocket I stash my snacks for the day. Keeping them in a pocket makes them easily reach yet out of the way. I even stashed a Brötchen sandwich in there one day and was pleased to see that it wasn’t totally smushed when I took it out of the pocket.
In the top mesh pocket I keep things like my passport, wallet, and sometimes my phone. These pockets not only helped me stay organized, they also provided added security because you need to open two zippers to get into them.
>> Click here to get your own Reed 17 backpack for your next trip!
Overall, I’m quite smitten with this pack and it’s now my go-to backpack. There are, however, a few things I’d love to add to this pack to make it pretty much perfect:
- Prettier interior color. I found the interior color on the boring side and would have loved a brighter color.
- Magnets in the handles. I’d love it if the handles would easily stick together but also pull apart easily.
- Lined pocket for sunglasses. If only that middle zip pocket on the front was lined!
- A second cinch strap. I’d love to be able to compress the bottom of the bag with another cinch strap.
- Rubber padding in the straps. The Reed 17 straps are comfortable and seem durable but if I could create my dream Reed 17 backpack, I’d vote for the same rubbery strap insides that my North Face backpack has.
So, to sum up, this Clark & Mayfield pack is a fantastic travel backpack!
If you’re looking for a roomy pack for travel that’s comfortable to carry and makes it easy to stay organized, check out the Clark & Mayfield pack. I highly recommend it.
You can order the Reed 17 here on Amazon!


Help.
Departure from Toronto (Pearson) July 19
Would like to see Auschwitz
Not sure if we should fly into Poland and take a night train with a sleeper to Munich, we have a hotel booked in Munich July 21. Or a stopover in Poland with enough time to visit and fly the rest of the way to Munich.
We are going to Germany for a family wedding.
If you’re leaving Toronto on July 19, you’ll arrive in Poland on July 20, which doesn’t leave you enough time to visit Auschwitz, even if you fly to Munich the next day (I don’t recommend a night train right after flying to Europe from Canada – go for a flight stopover if at all possible). I’d either leave Toronto a day or two earlier and do a 2-day stopover before flying to Munich or stop in Krakow/Auschwitz on your way home. You’ll want a minimum of one day in Krakow and one day for Auschwitz. Or you could visit the Dachau camp near Munich.